Create a Password-Protected S3 Static Site in AWS, the dumb way (i.e. manually)
April 6th, 2022
Creating a Private Website in AWS
In this post, we’ll create a private, password-protected static webpage in AWS. We will use S3, CloudFront, and Route53 to host the page, and Lambda@Edge and DynamoDB to password-protect it.
You may want a private page to securely interact with your AWS environment through a web UI that you create, or to host an internal-facing website for your company without the hassle and overhead of Cognito authentication.
Our solution improves on the ones presented here, here, and here, because:
- Its authentication mechanism uses salted hashing, rather than storing the password in plaintext
- It allows for multiple users / login credentials
- It lets you modify user credentials without redeploying the app
In contrast, the solutions above hardcode a single username and plaintext password directly in the source code of the Lambda@Edge function 🤮!
In this article we walk through the dumb (manual) way to do this. In the future, I will provide automated solutions using Infrastructure-as-Code tools.
Prerequisites
Coming soon...
You need Python3.7+ installed on your local machine
Creating the S3 Bucket
- Go to the S3 Create Bucket page at https://s3.console.aws.amazon.com/s3/bucket/create?region=us-east-1
- Choose a bucket name that no one else has ever used before. Enter a random suffix if necessary. For example: private-website-demo-asdf123 replacing "asdf123" with your own random suffix.
- Under AWS Region, select "US East (N. Virginia) us-east-1"
- Finally, click on the Create Bucket button at the bottom of the page
Uploading the Website static files to the Bucket
- We'll use CloudShell to upload a very simple website to S3. If this is your first time using CloudShell, it may take 5-10m to initialize. You can log in by either:
Following the direct link here: https://us-east-1.console.aws.amazon.com/cloudshell/home?region=us-east-1# OR
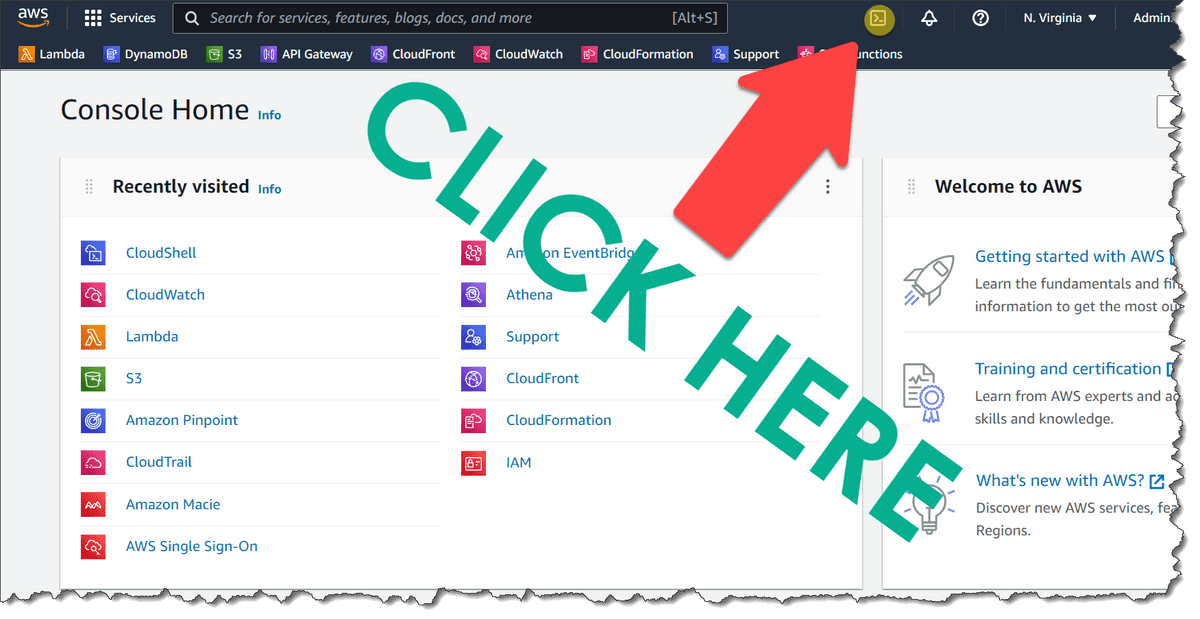
Clicking on the CloudShell icon in the upper-right corner of the browser (see image below).
- Once, CloudShell finishes initializing and presents you with a prompt, enter the following command, replacing YOUR_S3_BUCKET with the unique S3 bucket name you chose in Step 1.
bash1curl https://raw.githubusercontent.com/jamesshapiro/cdk-utilities/master/password-protected-website-example/index.html > index.html2aws s3 cp index.html s3://[YOUR_S3_BUCKET]
If everything is working, your CloudShell terminal should return an output like this:
[cloudshell-user@ip-10-1-93-109 ~]$ ▯
DynamoDB
- We'll use DynamoDB to store our user credentials including our hashed passwords.
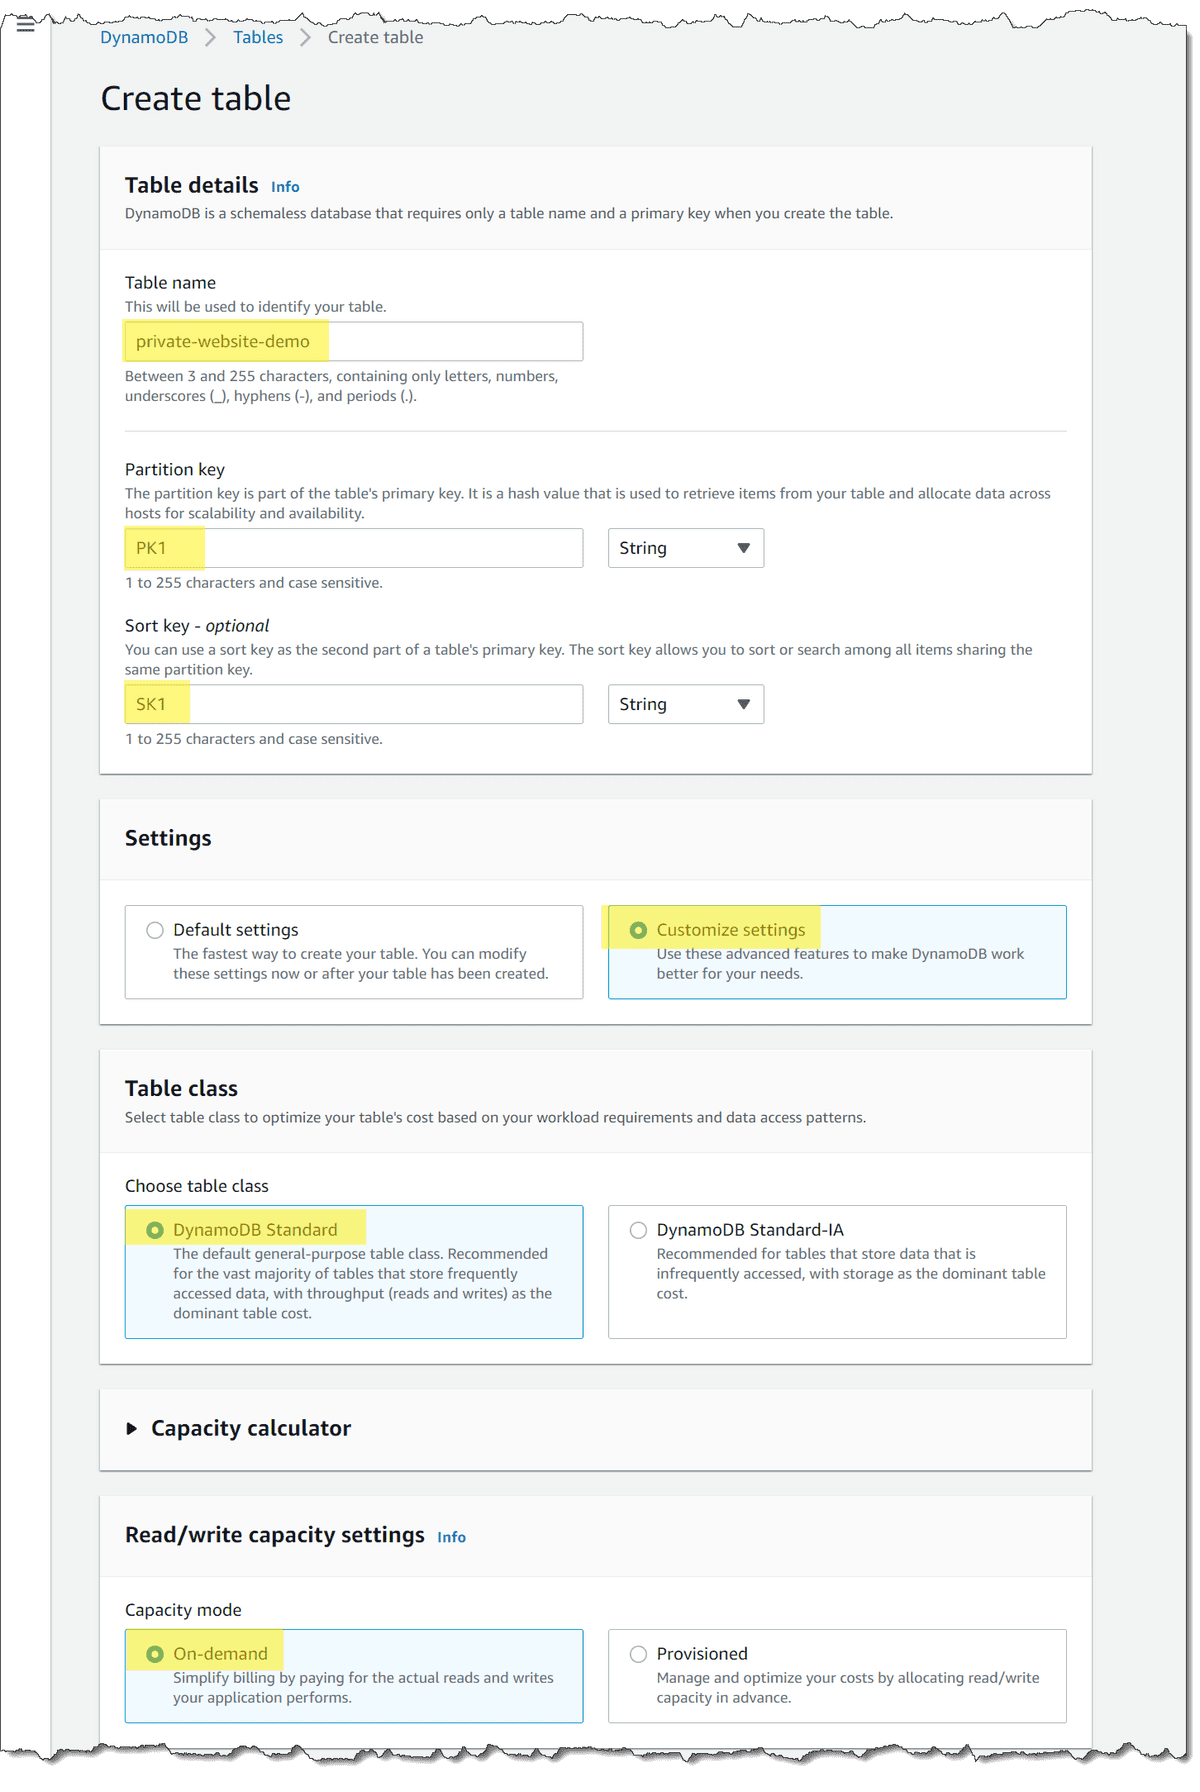
Go to https://us-east-1.console.aws.amazon.com/dynamodbv2/home?region=us-east-1#create-table
- Enter "private-website-demo" as the Table name
- Select PK1 as the Partition Key
- Select SK1 as the Sort key
- Under Settings select Customize settings
- Under Table class keep DynamoDB Standard selected
- Select On-demand under Capacity mode to minimize costs
Lambda
Creating the Function
- We'll use Lambda@Edge to force all visitors to enter a valid username and password before accessing the site
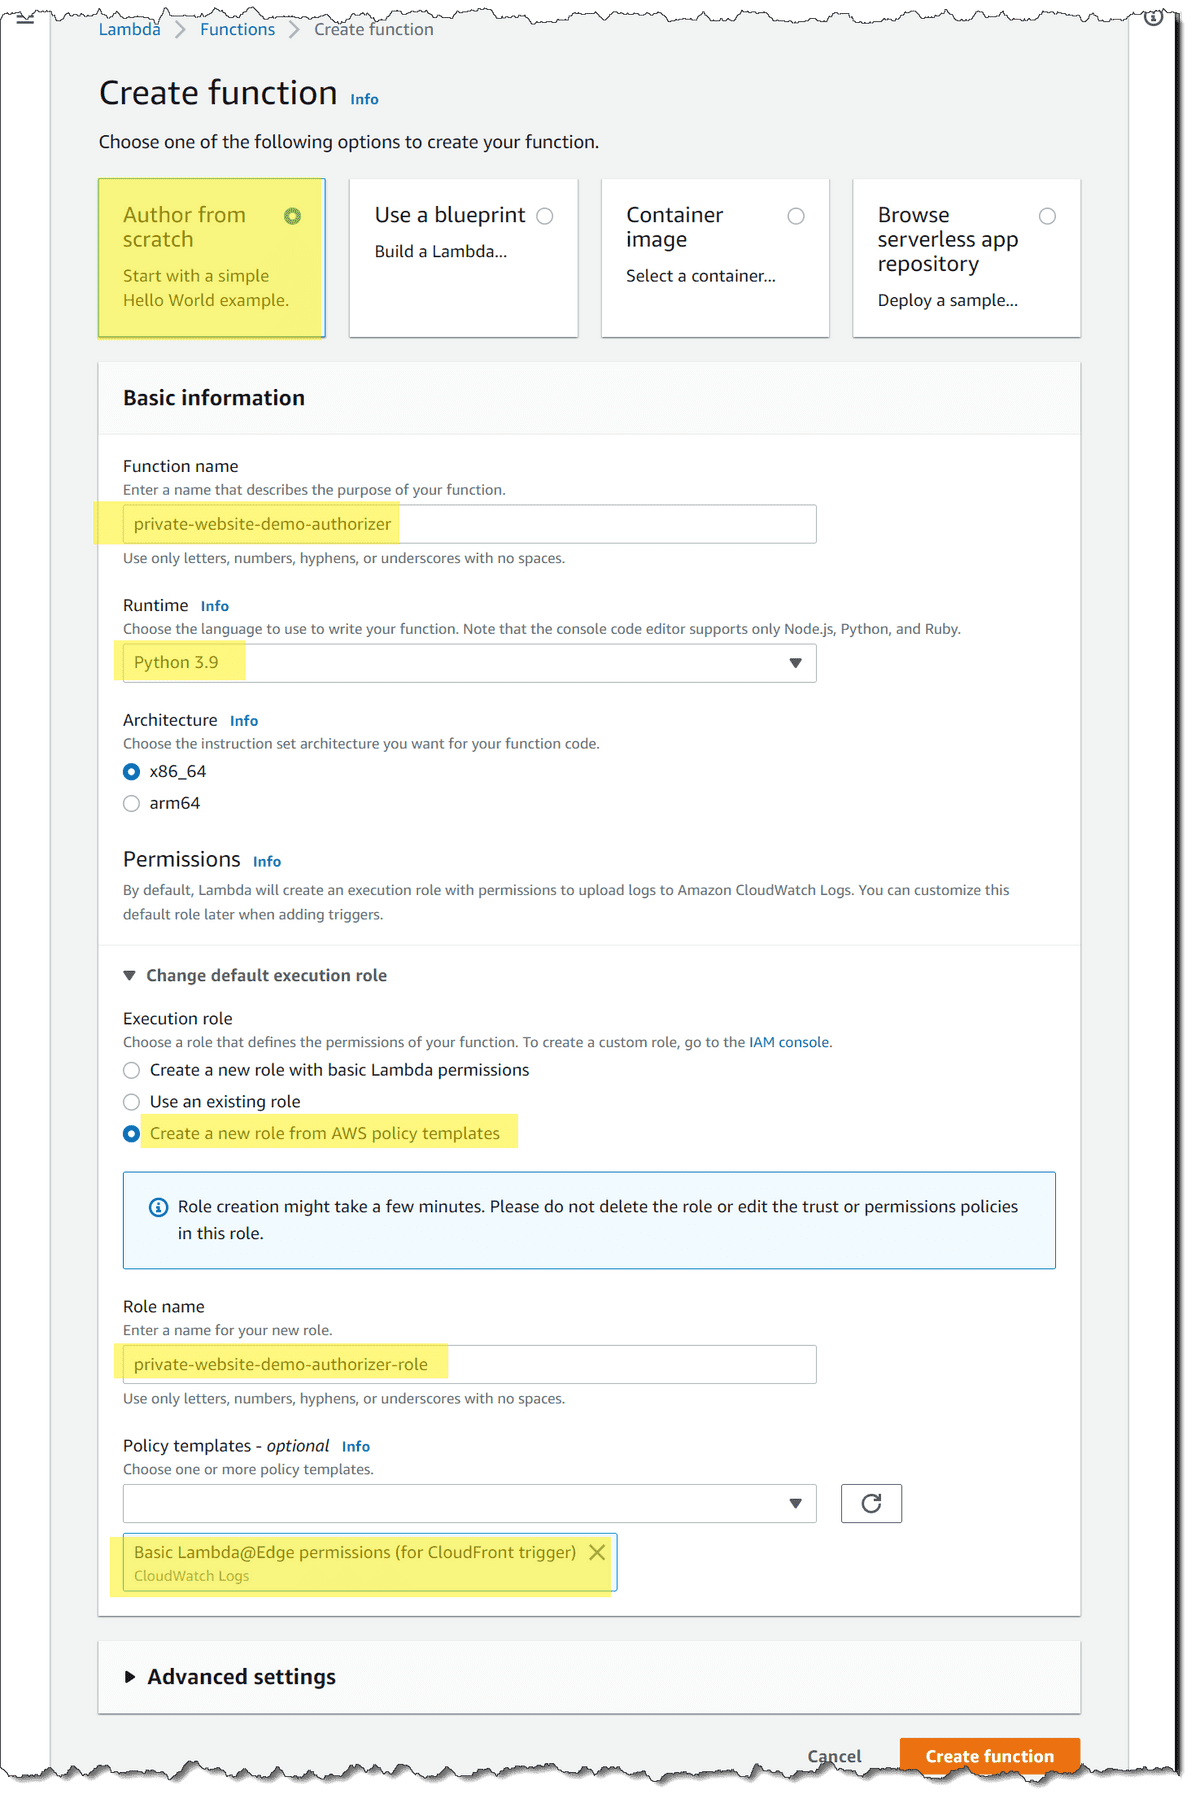
Go to https://us-east-1.console.aws.amazon.com/lambda/home?region=us-east-1#/create/function
- Keep "Author from scratch" selected
- Enter "private-website-demo-authorizer" as the Function name
- Select Python3.9 as the Runtime
- Select "Create a new role from AWS policy templates"
- Enter a descriptive role name, e.g., "private-website-demo-authorizer-role"
- Select "Basic Lambda@Edge permissions (for CloudFront trigger)" as the policy template
- Finally, click Create function
The function code
We'll add the following code to our Lambda function:
python1import hashlib2import base643import boto345unauthorized_error = {6 "status": '401',7 "statusDescription": 'Unauthorized',8 "body": 'Unauthorized',9 "headers": {10 'www-authenticate': [11 {"key": 'WWW-Authenticate', "value": 'Basic'}12 ]13 }14}1516def lambda_handler(event, context):17 TABLE_NAME = 'private-website-demo'18 TABLE_REGION = 'us-east-1'19 ddb_client = boto3.client('dynamodb', region_name=TABLE_REGION)20 request = event['Records'][0]['cf']['request']21 headers = request['headers']22 if 'authorization' in headers:23 # auth_string == 'Basic ' + auth_token24 auth_string = headers['authorization'][0]['value']25 auth_token = auth_string[len('Basic '):]26 decoded = base64.b64decode(auth_token)27 str_decoded = decoded.decode("utf-8")28 username_and_password = str_decoded.split(':', 1)29 # make username case insensitive30 username = username_and_password[0].lower()31 password = username_and_password[1]32 response = ddb_client.get_item(33 TableName=TABLE_NAME,34 Key={35 'PK1': {36 'S': f'USER',37 },38 'SK1': {39 'S': f'USER#{username}',40 }41 }42 )43 if 'Item' not in response:44 return unauthorized_error45 item = response['Item']46 salt = item['SALT']['S']47 auth_hash_value = item['HASH']['S']48 m = hashlib.sha256()49 m.update(bytes(salt, 'utf-8'))50 m.update(bytes(password, 'utf-8'))51 hex_digest = str(m.hexdigest())52 if hex_digest == auth_hash_value:53 return request54 else:55 return unauthorized_error56 else:57 return unauthorized_error
What this code actually does...
When a user first visits the page, no authorization headers are present. In this case, the function throws an unauthorized_error that causes the browser to prompt the user for a username and password. Once the user provides these, the function extracts the username and password from the authorization headers and then queries DynamoDB for an entry matching the username.
- If no such such entry is found, then we have an invalid username and the function throws another unauthorized_error, causing the browser to prompt the user for another set of credentials.
- But if the username entry is found, the function retrieves the salt and the salted hash for the correct password from the DynamoDB record.
Assuming the DynamoDB lookup succeeds, the function then uses the salt retrieved from the DynamoDB entry and the user-provided password to compute the salted hash of the user-provided password. Finally the function compares this user-password-derived salted hash to the correct-password-derived salted hash from the DynamoDB entry.
- If they do not match, then the password is invalid, and the user is prompted to provide another.
- If they do match, then the function returns the site HTML, CSS, and Javascript, allowing the user to access the site!
Adding the Function code to Lambda
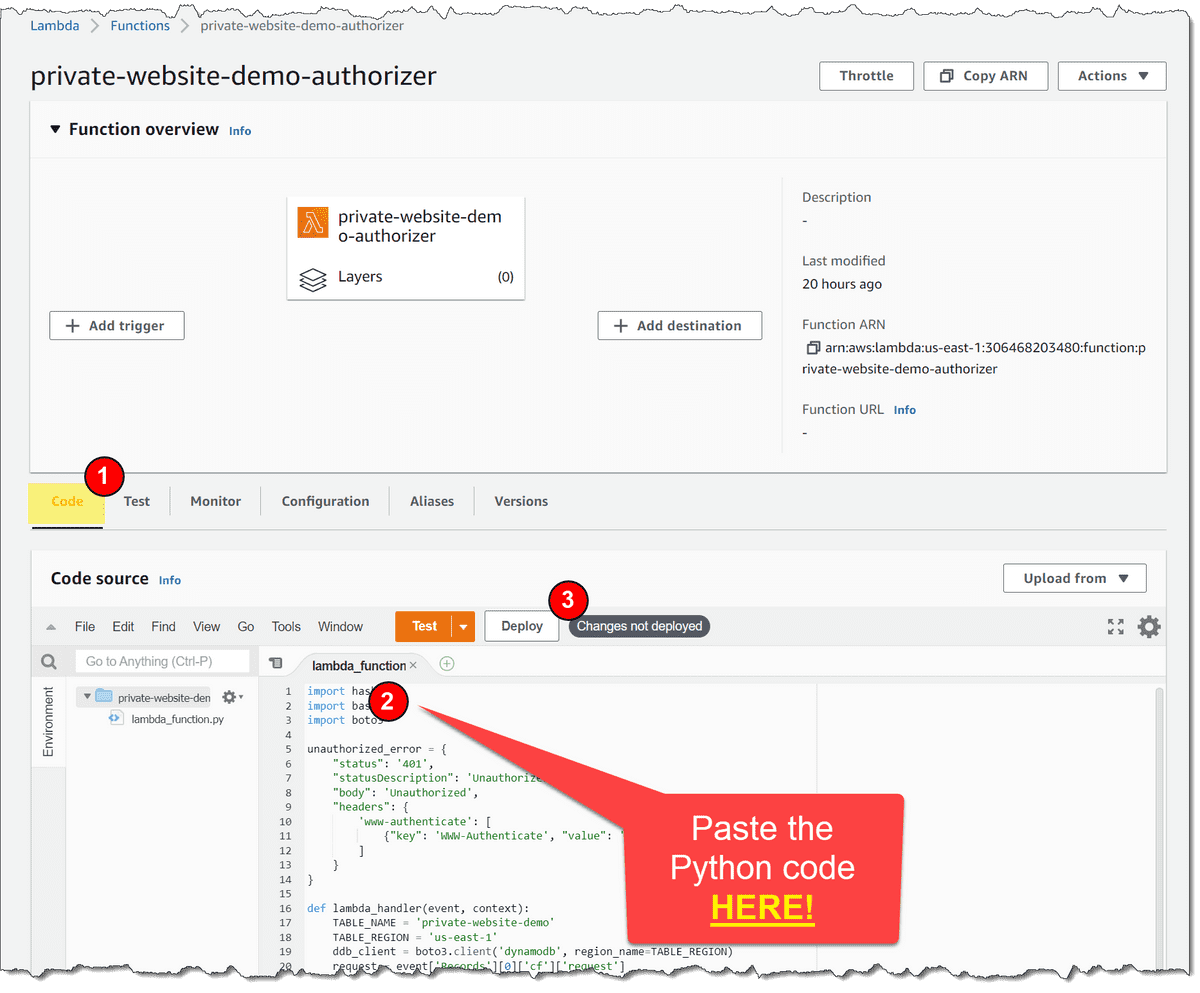
- Paste the authorizer Python code into your Lambda function
- Navigate to the Function overview page at https://us-east-1.console.aws.amazon.com/lambda/home?region=us-east-1#/functions/private-website-demo-authorizer?tab=code
- The "Code" tab should be selected, but if it is not, click on it.
- The "lambda_function.py" code should be open and displayed in the code section, but if it is not, click on it.
- Paste in the Python code from above.
- Finally, click Deploy
Granting the Lambda Function access to the DynamoDB Table
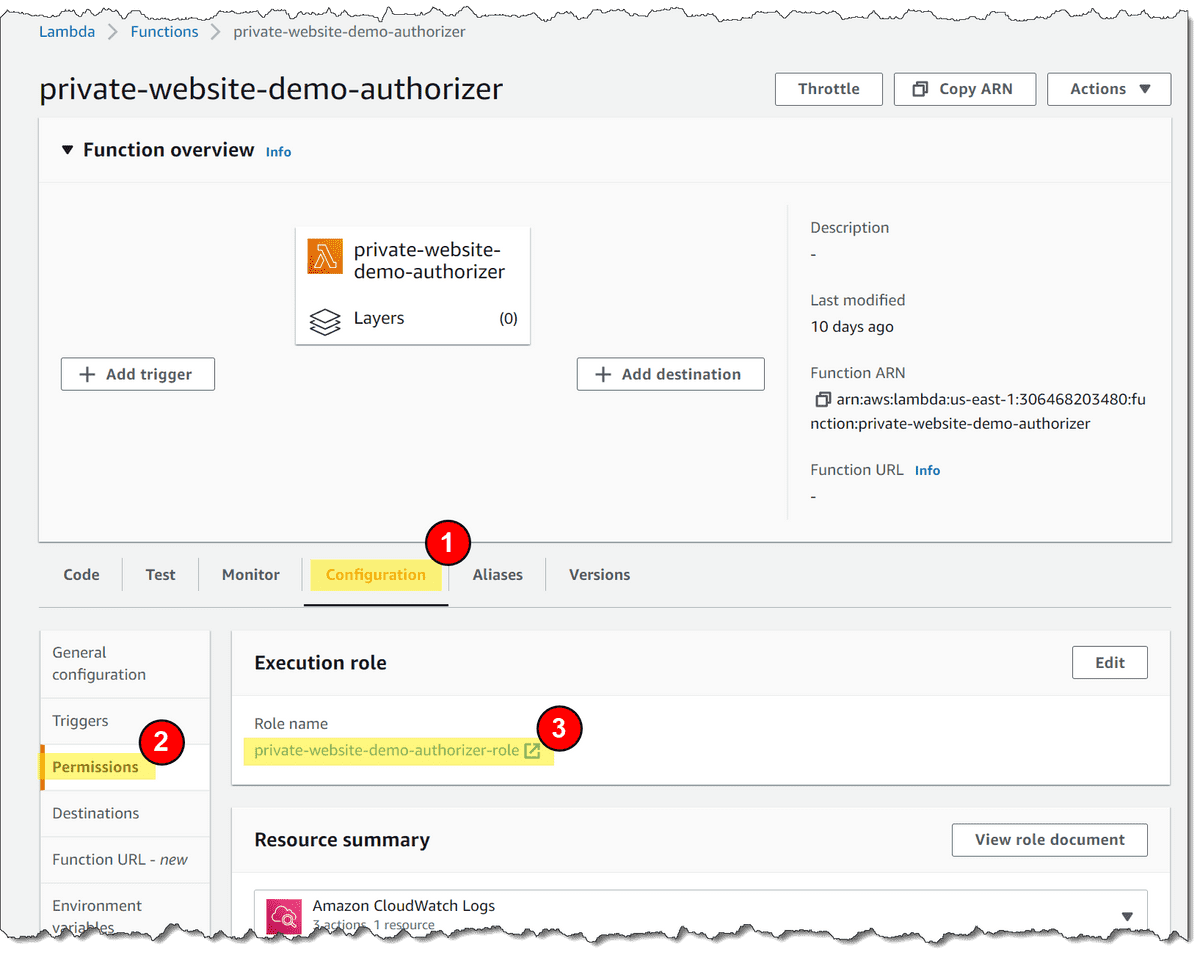
- Go to the Function Configuration tab at https://us-east-1.console.aws.amazon.com/lambda/home?region=us-east-1#/functions/private-website-demo-authorizer?tab=configure
- Navigate to the Lambda Function's role:
- Ensure the Configuration tab is select on the Function page
- Click the Permissions sub-tab on the left-hand side panel
- Click on the link under Role name (in my case private-website-demo-authorizer-role)
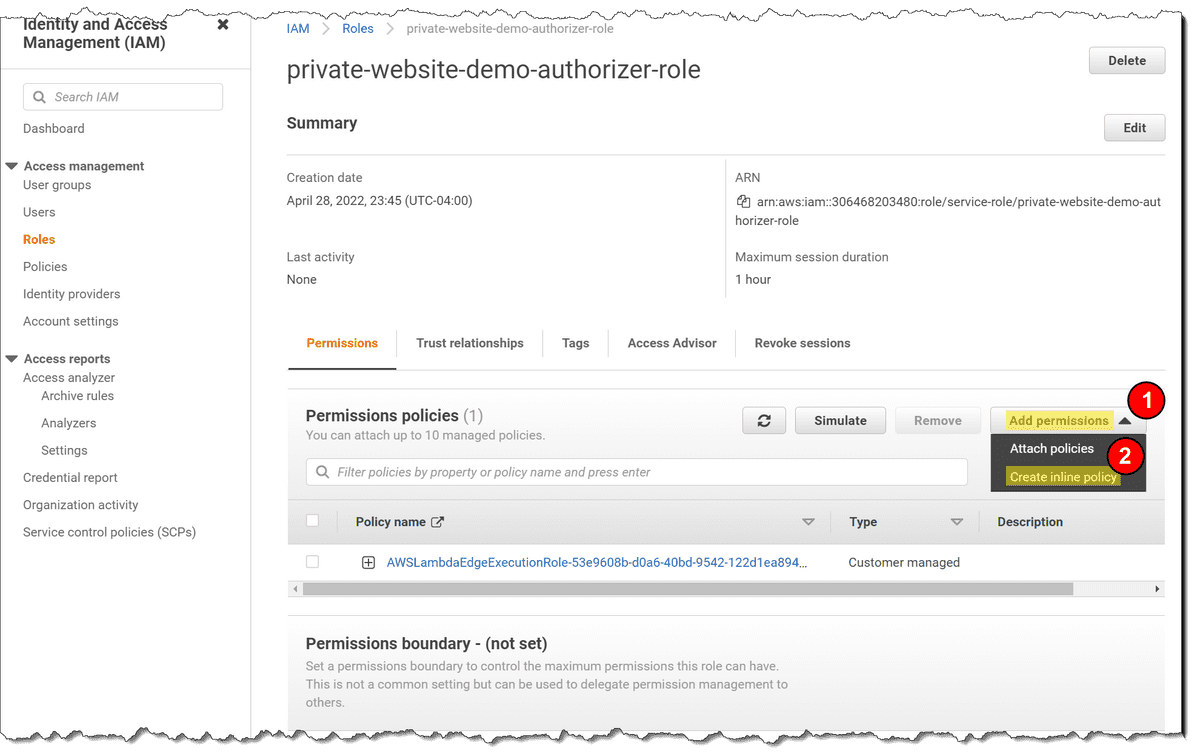
- Open the "create inline policy" view:
- Click on Add permissions
- Click on Create inline policy
- Create the policy
- Click on JSON
- Paste the following JSON into the body of the editor:
json1{2 "Version": "2012-10-17",3 "Statement": [4 {5 "Action": "dynamodb:GetItem",6 "Resource": "arn:aws:dynamodb:us-east-1:[YOUR-ACCOUNT-ID]:table/private-website-demo",7 "Effect": "Allow"8 }9 ]10}
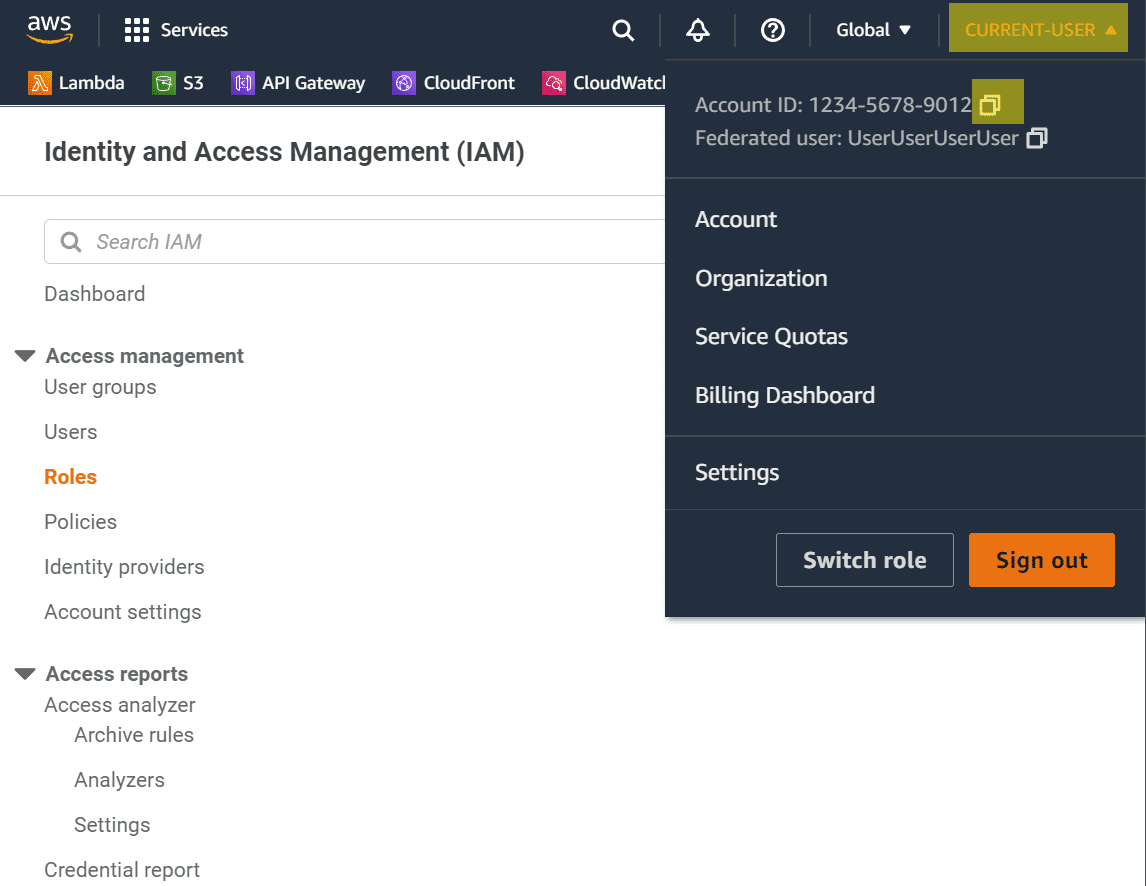
- Replace [YOUR-ACCOUNT-ID] above with your actual account ID:
- Click on your username in the upper-right hand corner of the console
- Click on the copy icon next to your account ID
- Paste your account ID into the JSON policy
- Click on Review policy
- Under Name, enter private-website-demo-authorizer-get-password
- Finally, click Create policy
Publishing the Lambda Function so it can be used as a Lambda@Edge Function
Coming soon...
CloudFront
- Go to https://us-east-1.console.aws.amazon.com/cloudfront/v3/home?region=us-east-1#/distributions/create
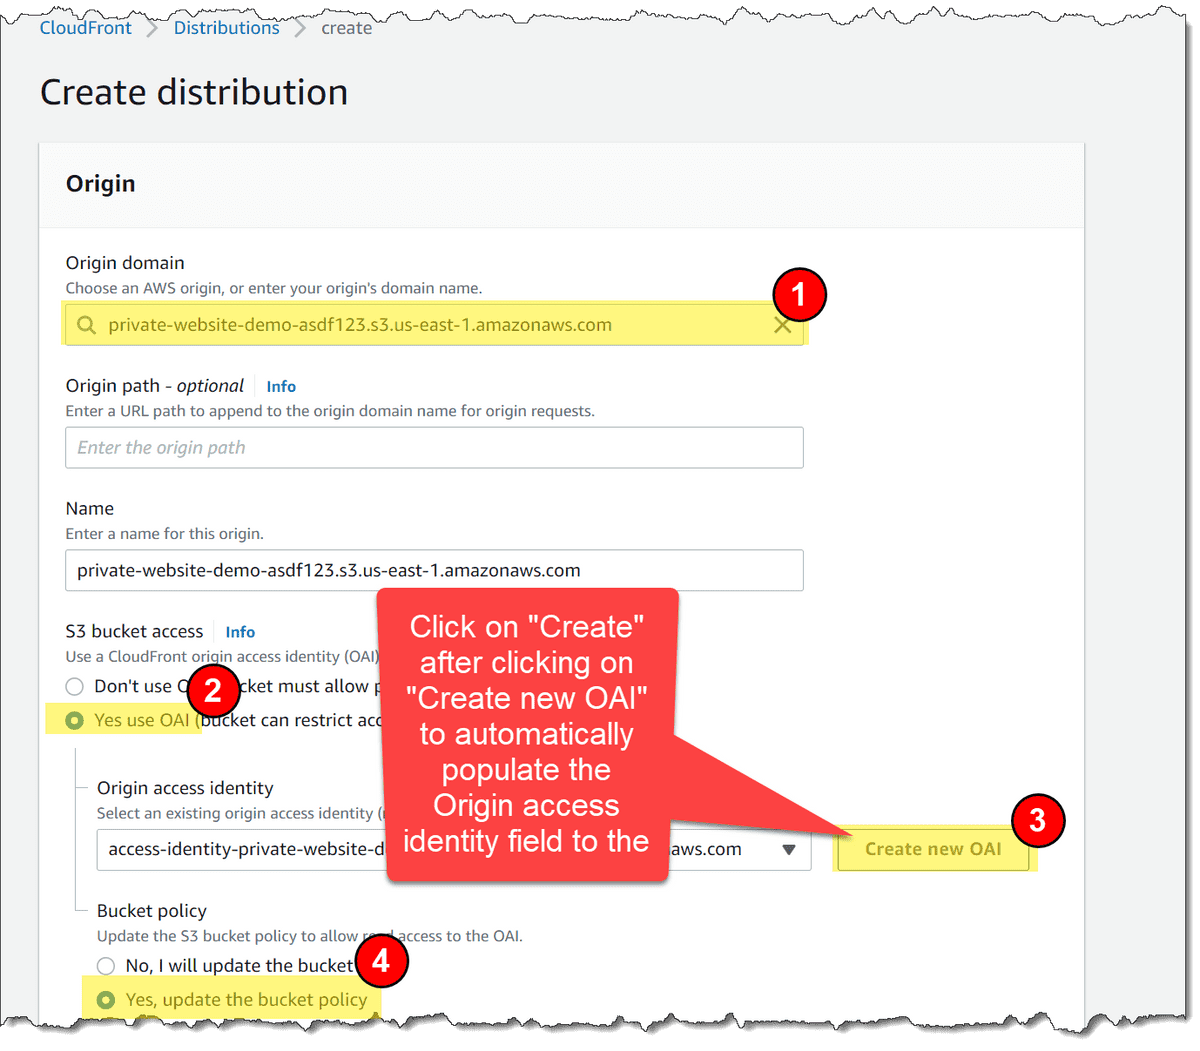
- Select the appropriate entry for the S3 bucket you just created from the "Origin domain" dropdown menu. If your S3 bucket is named EXAMPLE_BUCKET, then the origin entry will be EXAMPLE_BUCKET.s3.amazonaws.com
- Select "Yes use OAI (bucket can restrict access to only CloudFront)"
- Click "Create new OAI"
- Click Create
- Click "Yes, update the bucket policy"
- Scroll down
- Under "Viewer protocol policy" select "Redirect HTTP to HTTPS""
- For "Default root object" enter "index.html"
- For "Description" enter "Private Website Demo"
- Finally, click Create distribution
Remaining Steps
Coming soon... See: https://github.com/jamesshapiro/cdk-utilities/tree/master/password-protected-website-example if you're feeling impatient.
